Assignment 4
For this assignment, you will write a Processing implementation of the Wolfram
1-D Cellular Automaton
A Cellular Automaton is a collection of coloured cells on a grid of specified
size. The collection evolves through a number of discrete time steps based on a
specified set of rules.
More precisely, the screen is divided into square cells. Each cell is either
alive (having colour black), or dead (heaving colour white). Whether a cell gets
to live to see the next generation, depends on the cell’s state, and that of its
neighbours during the current generation, in accordance to a set of rules.
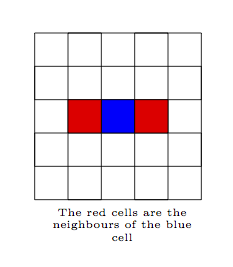
One of the factors that differentiate the types of automata, is what we mean
when we say neighbours. The 1-dimensional automaton is so-called because the
neighbours of a cell are defined as the cells immediately to the left and to the
right of it.
The state of a cell, together with its neighbours, determines the state of the
cell directly bellow it. Suppose we know the state of cell c, as well as the
states of c‘s left and right neighbours. There are eight possibilities —
4 if c is alive, and 4 if c is dead:
For each of these possibilities, the automaton has a rule that tells it what the
state of the cell immediately below c should be:
These rules can be read left to right, as follows:
- If c, c‘s left neighbour, and c‘s right neighbour are all
black, then the cell below c dies in the next generation and is white.
- If c and its left neighbour are black, but c‘s right neighbour is
white, then the cell below c lives in the next generation and is black.
- If c is white but both of its neighbours are black, then the cell
below c is coloured white.
- If c and its neighbour are white, but c‘s left neighbour is black,
then the cell below c comes to life and turns black.
- If c and its right neighbour are black, but c‘s left neighbour is
white, then the cell below c lives on and is coloured black for the next
generation.
- If c is black but both it’s neighbours are white, then the cell below
c turns white for the next generation.
- If only the right neighbour of c is black, then the cell below c turns
black for the next generation.
- If c and both of its neighbours are white, then the cell below c
is coloured white for the next generation.
As you can see, these 8 rules cover all the different configurations that 3
cells could have. To be concise, we can write only the result of each rule (in
the same order as above) like so:
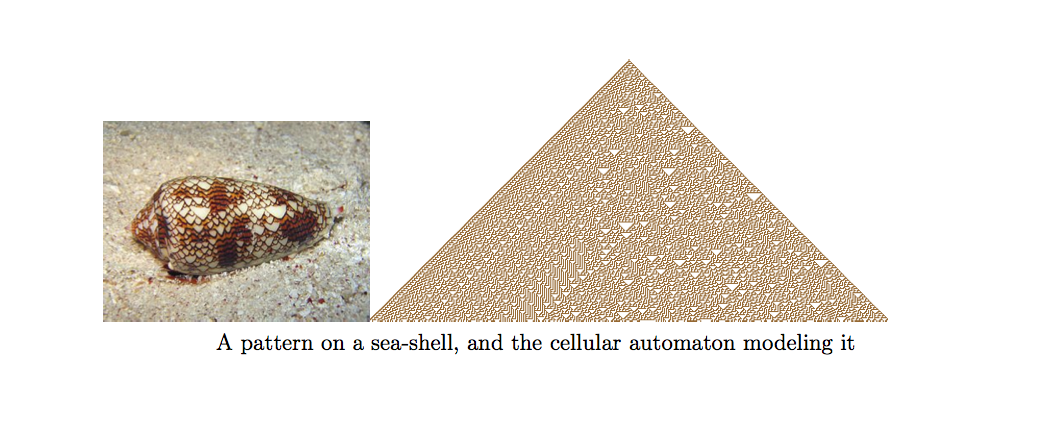
Cellular Automata are marvellous creatures, used in a large host of
applications, including Computer Science, Physics, and Biology. We will use them for their
artistic value.
Implementation
For this assignment there are a total of 60 marks plus 2 bonus marks.
Getting Started
As in previous assignments, some helper code is provided for you in two files,
located here. Download it and unzip the files into
a folder named wolframCells. The two files are:
executeRules.pde
This is a file containing code that well help in executing the automaton’s
rules. The code has been implemented for you. Do not modify this file! Simply
include it in the same directory as wolframCells.pde.
The executeRules.pde file contains one function, with the following
signature:
boolean executeRules(boolean left, boolean centre, boolean right) {
    ...
}
This function takes three boolean parameters left, centre, and
right. These represent a trio of cells. left is true if the left
cell is black, and false otherwise. centre and right are analogous.
The function returns true if the cell directly below the cell represented
by centre should be alive. Otherwise, the function returns false.
You will use this function when implementing shouldLive().
Warning
Modifying executeRules.pde might result in your program not
working correctly, or possibly not running at all. As such, we will not
be using your executeRules.pde file.
Since there are several components in this program, it is important that you
follow the instructions on this page carefully. Further, some of the
instructions may be ambiguous. This is intentional and is designed to help you
practice seeking clarification from your clients (in this instance, the course
instructor and TA).
Since you will be using ArrayLists in this assignment, you might find this
list of ArrayList functions useful.
High Level Overview
The program you write will work as follows:
There will be two phases to the program. The rule phase and the simulation
phase. The rule phase is displayed when the program starts.
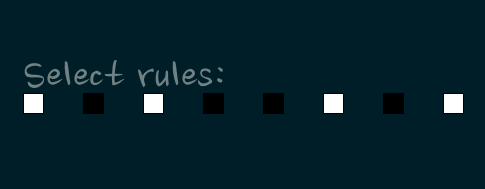
During the rule phase, 8 white squares are displayed on the screen. These
represent the set of rules.
If the user clicks on a white square, the square turns black. If the user
clicks on a black square, the square turns white.
The user can then press any key on the keyboard to start the simulation
phase.
Pressing any key while the simulation is running returns to the screen
showing the rules.
We will have two classes in the simulation. A Cell class, and a Rule
class. Each cell is a 1x1 pixels square.
During the simulation, each call to draw represents a generation. A generation
consists of a row of cells, with the first cell having x position 0 and
the last cell having x position width - 1. A computation is then
performed on the current generation to determine the next generation. This
next generation is then drawn on the screen, below the previous generation, And
so on. For example, suppose we have a 5x5 grid of cells. Using the rule above,
and generation one consisting of one live cell, we get the following evolution over
five generations:
Notice that for cells 1 and 5, we assume there are cells 0 and 6 respectively,
which are always dead.
Global Variables
As global variables, you must declare the following:
- (1 mark). An ArrayList named cells containing objects of type Cell. This
list will contain all of the cells in the current generation.
- (1 mark). An ArrayList named rules containing objects of type Rule.
- (1 mark). A bolean variable indicating whether the simulation has started.
Note that in the helper code we have assumed you called it started. Feel
free to change this, but remember to make the corresponding changes where
needed.
- (1 mark). A liveColor variable containing the colour used for live cells. In this
specification I have used black, however feel free to choose any colour you
like. You must use liveColor, or the excecuteRules() file will not
work properly.
- (1 mark). A deadColor variable containing the colour used for dead cells. As with
the liveColor, this can be any colour you choose (that is not the
deadColor).
- (1 mark). A PFont variable.
Cells
Our cells will be implemented as a class. In the file wolframCells.pde, a
class Cell has been declared. Since it is empty, you must fill it with the
following:
- (1 mark). The Cell should have an (x, y) position.
- (1 mark). A cellColor variable of type color.
- (1 mark). An int containing the Cell‘s number.
Functions:
(3 marks). Constructor with the following signature, that initializes the
Cell object:
Cell(float a, float b, int num, color initColor)
(4 marks). A boolean function shouldLive(). This function returns
true if the Cell should live on to the next generation and false
otherwise. To do this, you must access the Cell‘s neighbours. These are
the Cell objects stored immediately before and after this Cell in the
cells ArrayList. See the description for the setupSimulation
function.
You will need to determine whether this Cell and its neighbours are
alive or not, and pass that information to the executeRules() function.
(2 marks). A boolean function isAlive() that returns true if this
Cell is alive, and false otherwise. Recall that a cell is alive if only
if its colour is black.
(2 marks) A void function render that is responsible for drawing
this Cell onto the screen. Each Cell is 1 pixel wide and 1 pixel
high.
Rules
The class Rule represents a single rule. For our purposes, a rule is a
square of width and height at least 20. The Rule object will have the
following attributes:
- (1 mark). An (x, y) position.
- (1 mark). A width and height (be careful not to override the width
and height) global variables.
- (1 mark). A ruleColor variable.
Functions:
(2 marks). A constructor with the following signature that initializes
the rule object:
(1 marks). A boolean function wasClicked() that returns true if
this Rule was clicked, and false otherwise.
(2 marks). A toggleColor() function that toggles the rule colour.
(2 marks). A render() function responsible for drawing this Rule
to the screen.
Main Program
The following functions must be implemented for your simulation to work:
(3 marks). setup():
- Set the size of the screen to 500x500.
- Initialize the two ArrayLists.
- Load a font created by you into the PFont global variable.
- Call setupSimulation() (this line is already in the helper code).
(3 marks). draw() :
- The only thing you need to add to draw is code to tell all of the cells to
render. Other than that you should not modify draw().
Warning
You do not need to call background() in draw().
(3 marks). mouseClicked():
- Determine whether a Rule object was clicked. If so, toggle the Rule
object’s colour.
(2 marks). keyPressed():
- Implement the behaviour described in the high level description:
if the simulation is ongoing, stop it and show the rule screen. You may
also want to setup the simulation again.
If the simulation is not running, start it.
(4 marks). showRuleScreen():
- Add 8 new Rule objects to the rules ArrayList. To get full
marks, you must use a while loop.
- Draw all of the rules to the screen. In a fashion similar to the image
below.
- Prompt the user to “select rules” using the font you initialized in
setup().
(5 marks). makeNextGen():
- In the helper code, an ArrayList by the name of nextGenCells is
declared and initialized for you.
- For every cell c in cells, add a new Cell to
nextGenCells. The new cell should have the same x position
as c, and y position 1 pixel down. It should have the same
cellNum as c and the colour of the new cell depends on
c.shouldLive().
- Having filled nextGenCells with the next generation, we need to copy
the contents of nextGenCells into the cells ArrayList so
they can be drawn to the screen. See the comments in the helper code
for details.
Style
There are 6 marks available for style, 2 for each of:
- Clear and consistent variable names
- Clear and consistent indentation.
- No Hardcoded values. If a value repeats often (e.g. the black color) it
should be stored in a variable (e.g. liveColor), and not appear
directly. You can check for this by searching for the value. The only
result ought to be where you define variable(s) to hold this value.
Bonus
For 2 marks, find the rule set that produces the shell pattern, and one more interesting pattern not shown in this
assignment description. Provide your answers in the form of screen shots of your
rule screen.
What to Submit
Please rename the given file (wolframCells.pde) to
firstname_lastname_studentNum_assn4.pde, where firstname_lastname is
your full name separated by an underscore and studentNum is your student
number.
What you should submit is a folder called
firstname_lastname_studentNum_assn4 that contains the pde file as well
as the vlw files for the font you created, and any images you may have used,
inside a subdirectory named data. Also include any screen shots you made for
the bonus question. Compress this folder as an archive named
firstname_lastname_studentNum_assn4.zip.
How to Submit
Please submit this assignment on-line
no later than the due date listed on the course marking scheme.
If you submit the assignment after the deadline, you will be deducted %10 of
the maximum points available for the assignment, for each day that you are late.
For example if the assignment when submitted on time is marked out of 100,
then after one day the maximum mark will be 90, after two days it will be 80,
and so on.
Warning
Several minutes late is the same as a day late! While we have been
lenient in the past, we will not be from now on. Give yourself at least a half
hour to make sure you submit your assignment on time. Further, we will be using
the clock on the submission system, not the one on your computer.
Warning
After submitting your assignment, download it, open the zip archive
and make sure that you have submitted the correct files and that everything
works. If something goes wrong, then by the time the TA gets to your assignment
it will be too late to do anything about it and you will receive a 0 on your
assignment.