|
PROJECT 2: TABLES AND CSS |
||||||||||||||||||||||||||||||||||
|
This project has two parts. Part 1. Modify your web page for assignment 1 by using style sheets. Pay attention to consistent design of the home page. Try to avoid using physical markup -- use CSS instead. In subsequent assignments, always avoid using physical markups when you repeat the same style multiple times. You can choose to create a standalone CSS document to include or add CSS definition to the beginning of each web page. Part 2. Add three more pages to your web site, and link to them from the first page that you designed in your project 1. These three pages belong to an online-store where the users can make purchases of movies. The page should have three areas. The following picture shows its structure:
Following is an example page
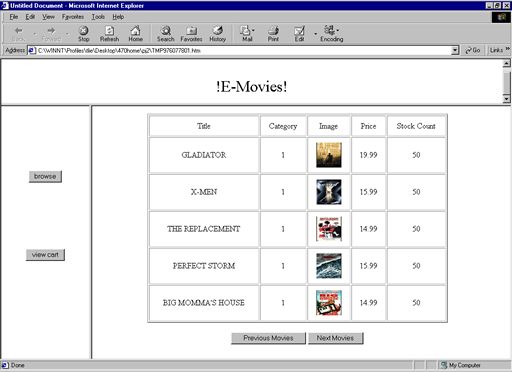
You can design the other two pages using the same format, and choose the movies, as you like. Just fill in a reasonable price and stock count (>0) for each movie. You can decide your own category values to denote different types of movies ( for example, you can use “action” “romance” instead of integer codes.) Later, we will use each table to denote results from a user query. An example screen shot is like the following:
The user will first see the above page. They then can use the 'next movies' and 'previous movies' buttons to jump to any one of the three movie tables. Although the above picture shows frames, in your project PLEASE DON'T USE FRAMES! You can use tables to get the above effects. |
||||||||||||||||||||||||||||||||||
|
|
||||||||||||||||||||||||||||||||||


 :
: