15. Fonts
In these notes we will discuss:
- How to create Processing font files (.vlw files) using the Processing editor.
- How to load fonts from disk and display them.
- How to move fonts around the screen.
15.1. Introduction
We’ve seen that println can display strings on the console window. But what if you want a string to appear in the graphics window? That’s move involved because fonts — the images representing the characters in a string — have so many different properties. If you’ve ever played around with a word processor, then you have some idea of the variety: you can specify a font’s location, style, size, weight (i.e. thickness of stroke), colour, and more. As a result of all of this choice, hundreds of different fonts have been created, and choosing appropriate fonts for whichever task you have in mind takes skill and experience.
Processing makes it relatively easy for you to use lots of different kinds of fonts. To use a font in Processing, follow these steps:
Create the .vlw file. This file stores the font images for each character. The Processing IDE provides a handy tool for creating font files:
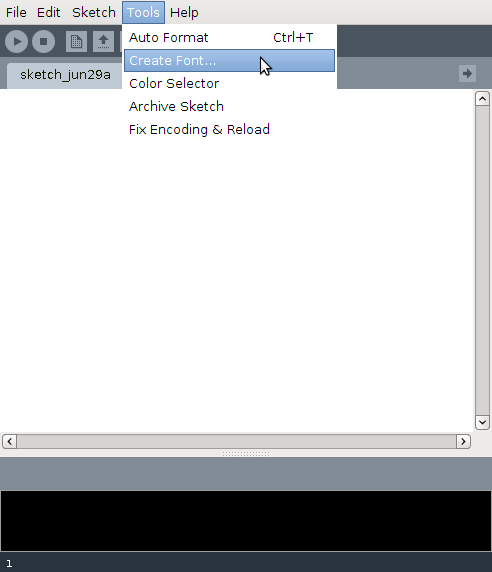
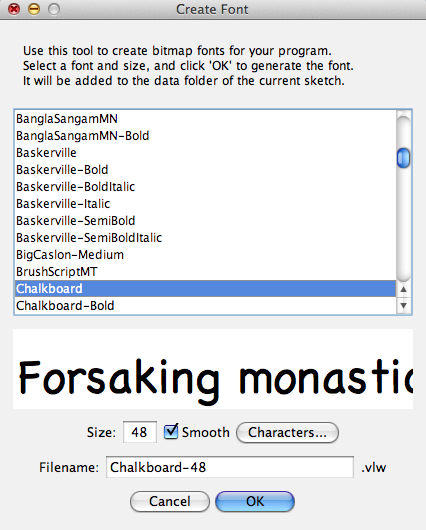
Inside the font selector tool, you are presented with a list of fonts to select from (notice it is quite varied), and there is an instant preview underneath the list. You can also select the size (in pixels) of characters drawn with this font, as well as other options. Finally you can choose a name for it, and click OK. The result is that a file of the form <fontname>-<size>.vlw is created under the data folder inside the folder containing your program.
Once the font file exists, you can load it from the dist into memory using the loadFont function (recall that we had a similar function to load images).
Once a font resides in memory, you can set it as the font to be used by using the textFont function.
Finally, the function text(str, x, y) displays the string str at location x, y.
Compared to calling println(str), this is a lot more work! But this extra complexity buys us flexibility: we have a lot more control over our fonts. In contrast, println gives you no flexibility when it comes to displaying the text. Your text will be displayed on the console, using whichever settings the console uses to display text, and that’s the end of that. With that in mind, let’s see an example of font creation and usage in Processing
15.2. Creating Fonts in the Processing IDE
Let’s start with a simple example, just to get the hang of using fonts in processing. Later we’ll see a few more elaborate examples.
The program we’ll make will just print “Hi Everybody!” to the screen. The first step is to choose which font we’d like to use. Look at the list of fonts in the font creator window and choose a font you like. For example, “Raanana” at size 48. After clicking OK, this creates a file called “Raanana-48.vlw” that stores all of the font information.
The second step is to load the information from the file into memory, and store it in a variable. For this we use Processing‘s PFont type:
PFFont font;

void setup() {
    size(500, 500);
    font = loadFont("Raanana-48.vlw");
    // ...
}

void draw() {
    // ...
}
Notice that we need to use the variable font as a global variable to store the result of calling loadFont(). PFont is the main Processing class for representing fonts in memory.
Note
As it explaines on the loadFont() documentation page, the font file needs to be inside your program’s data folder. I.e. a folder named data that is in the same folder as your source code file. You’ll get a “Could not load font...” error if the .vlw file is not there. Handily, When you create a font using the Processing IDE font creator, it places it in the data folder (creating one if it doesn’t exist).
Once the font is in memory, we have to set it as the current font to be used. In our application we’re only using one font. However you might find yourself writing an application using several fonts. The textFont(PFFont f) function is used to tell Processing to use the font f for any text that is drawn after it was called. This is similar to how the fill() and stroke() functions operate.
PFont font;

void setup() {
    size(500, 500);
    font = loadFont("Raanana-48.vlw");
    textFont(font);
}

void draw() {
    // ...
}
Our Raanana font is of size 48, but you can change it’s size when calling textFont, for example, by calling textFont(font, 32) to make the font a little smaller.
Warning
Changing the size of a font using textFont often results in visual blemishes such as jagged edges or blurriness. To ensure that your fonts look good, it’s usually best to create them at the desired size using the Processing IDE font creation tool, rather then changing their size in textFont.
Finally, we are ready to place the text on the screen. We’re also going to draw a line directly below the text. This is to illustrate that the (x, y) position given when we write text refers to the bottom left corner of the text (unlike rectangles, in which it refers to the top right!):
PFont font;

void setup() {
    size(500, 500);
    font = loadFont("Raanana-48.vlw");
    textFont(font);
}

void draw() {
    String s = "Hi Everybody!";
    text(s, 50, 200);
    line(50, 200, 50 + textWidth(s) , 200);
}
Notice the function takeWidth() which takes in a string s and returns the width of s, when rendered on the screen using the font size specified when loading the font (in our example, 48). To get the height of text on the screen, use the textAscent() function. The next example illustrates using textAscent().
15.3. Colouring and Moving Text
Having the drawn the text onto the screen, we can make it move like any other shape, since when drawn, we specify its (x, y) coordinates. For example, the following programing will make a string “bounce” up and down on the screen:
PFont font;

float x, y, dy;

void setup() {
    size(500, 500);
    font = loadFont("Raanana-48.vlw");
    textFont(font);

    x = 50;
    y = 50;
    dy = 3;
}

void draw() {
    background(255);
    fill(255, 0, 0);
    text("Hi Dr. Nick!", x, y);

    // move the text
    y += dy;

    // top edge?
    if (y - textAscent() <= 0) {
        dy = -dy;
    }

    // bottom edge?
    if (y >= height - 1) {
        dy = -dy;
    }
}
Of note in this program:
- To change the colour of text drawn on the screen, we use the fill() function.
- The textAscent() function is used to determine the height of the text. Since the location of block of text is defined as it’s bottom-left corner, we must subtract the height from y. For the same reason, when we check for the bottom edge, it’s enough to check if y has past height - 1.
15.4. A Simple Word Processor
Let’s consider another example with fonts. This time, we will incorporate the keyboard, and write program that mimics the basic operation of a word processor.
Our word processor is going to be very simple. The only features we will have are the ability to type in words, start a new line, delete characters, and make 4 spaces at once, using the tab button. It will also have a blinking cursor at the end of the line.
We’re only going to need two global variables:
String typedText; // Here we will store the text from the user.

PFFont font; // The font we will use.
For reasons that will become clear later, we will make a wider than usual screen, and an empty textTyped string. Of course, we also need to make sure the font we want to use is available in the source folder.
String typedText; // Here we will store the text from the user.

PFFont font; // The font we will use.

void setup() {
    size(1000, 500);
    font = loadFont("Rannana-48.vlw");
    textFont(font);

    typedText = "";
}
At each call to draw, we will set the background and colour of the text. The cursor will simply be the | character, and we will use two variables that processing keeps track of to draw it.
- You are already familiar with the frameRate variable, containing the number of calls to draw() per second.
- We will also use the frameCount variable, containing the total number of calls to draw() since the program started running.
To give it a nice look, we want to draw the cursor for about half a second, then vanish it for another half a second. In Processing terms, we want to draw the cursor for the first frameRate / 2 calls to draw() and not draw the cursor for the latter calls.
Recall that the expression frameCount % frameRate returns the remainder of dividing frameCount by frameRate, and this value grows consecutively with frameCount until it hits frameRate - 1, in which case it circles back to 0. So we will draw the cursor for the first frameRate / 2 calls to draw, by only drawing it when frameCount % frameRate is at most frameRate / 2:
void draw() {
    background(255);
    fill(123, 50, 50); // A brownish sort of colour.

    // Our cursor will just be the character '|'
    // To achieve the blinking effect, we will only
    // draw it for frameRate / 2 calls to draw.
    // frameCount is the number of calls to draw() since
    // the program started.
    String typedTextAndCursor = typedText;
    if (frameCount % frameRate <= frameRate / 2) {
        typedTextAndCursor += "|";
    }

    // Display the typed text on the screen.
    text(typedTextAndCursor, 10, textAscent(typedTextAndCursor));
}
To deal with keyboard input, Processing provides us with a set of functions similar to those for mouse input. You’re welcome to read about them here. For now we will only need the keyPressed() function, which gets called when a key is pressed, the key global variable which holds information about which key was pressed, and special variables for some of the keyboard keys:
void keyPressed() {
    // 'key' holds the value of the last key.
    if (key != CODED) { //
        if (key == BACKSPACE) { // User wants to delete text
            if (typedText.length() > 0) { // there better be text to delete
                typeText = typedText.substring(0, typedText.length() - 1);
            }
        } else if (key == TAB) { // pressing tab gives 4 spaces.
            typedText += "    ";
        } else if (key = ENTER || key == RETURN) { // make a new line
            typedText += "\n";
        } else { // it's a regular key, simply add it to textTyped
            typedText += key;
        }
    }
}
There are few things to notice about the code above:
The logic of the function is simple: a key has been pressed. It is one of roughly 105 keys (on a standard keyboard), and depending on what the key was, we will perform some action. The structure of an if-else-if statement is perfect for this, since it allows us to perform some special actions (e.g. if the key pressed was a tab or a backspace), but to bunch together all of the cases which are similar under the else clause at the end.
As mentioned the key variable contains the most recent key press. The special variables (notice the capital letters) BACKSPACE, TAB, ENTER, and RETURN are used to denote the keyboard keys by the same name. The reason we have both ENTER and RETURN is that one is used for PC machines, which the other is for Macs. By checking both using the || we are making sure that the program will work regardless of the computer used.
Getting things to work on different platforms (aka cross-platform development) is one of the things that Java (and therefore Processing) is good at, but sometimes we still have to be careful.
When key == BACKSPACE the user wants to delete a character. Since we record everything the user typed in the textTyped, this means we have to delete the last character of text typed. This is done with the typedText.substring(int start, int end) function, which returns the substring of typedText that starts at start and ends at end - 1. Calling typedText.substring(0, typedText.length() - 1) returns the string containing all but the last character of typedText. We then store this result in typedText, effectively erasing the last character of the text.
15.5. Questions
- Name 5 different properties of fonts.
- Answer true or false for each of the following statements.
- The Processing IDE comes with a font creation tool that lets you create your own .vlw font files.
- The loadFont function loads .vlw files into memory.
- The textFont function returns the name of the font that will be used when text is drawn on the screen.
- The function print(x, y, s) displays string s at location (x, y) on the screen.
- What is the name of the class Processing uses to represent fonts?
- What is a potential problem of using textFont to change the size of a font?
15.6. Programming Questions
Write a program that puts Hello everybody! 5 times on the screen (not the console!). Use 5 different fonts and five different colors.
Write a program that puts the string I like red apples. on the screen (not the console!) all on one line. The word red should be colored red, and in a different font, than the rest of the string in a different color.
Write a program that puts the string “Drag me around!” on the screen (not the console!), and allows the user to drag it around on the screen.
Write a program that makes the string "ball" bounce around the screen. It should bounce off the screen edges.
Write a program that displays a digital clock in the middle of the screen that shows the current time (hours, minutes, and seconds), and whether or not it is “am” or “pm”. The clock should, of course, change as the current time changes. Look at the example for hours to see how to access the current time in Processing.
Test it with, at least, the following times:
7:05:02am
7:05:02pm
12:01:00am
12:01:00pm
Notice that in the word processing program, the text doesn’t “wrap around” when we hit the edge of the screen. That is, if we continue typing without pressing the return key, no new line character will be added, and the text will continue on to the right.
Modify the program so that the text wraps around when it gets close to the right hand side of the screen. You will need to use the textWidth() function, as well as the string function .lastIndexOf(String str). If str1 and str2 are strings, you use this function by calling str1.lastIndexOf(str2). What you get back is the index of the last occurrence from the left (or the first occurrence from the right) of str2 in str1. So for example "Hi \nthere\n hello!".lastIndexOf("\n") returns 9.