Starting with Raphaël
In this section, we will start using a JavaScript library that we can use to create and manipulate SVG graphics on the page.
Recall that SVG is a vector graphics format: the image is made up of shapes not pixels. Because of this, we can use JavaScript code to create of manipulate those shapes. If we were working with bitmapped images, we would have to draw pixels: there are libraries to help with that but vector images are just easier to work with to start with.
The library we will be working with is called Raphaël. It is a library created to make working with SVG images easy in JavaScript. As a first example of working with Raphaël, let's recreate the “simple image” from the graphics topic:

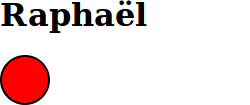
This image is 50 pixels wide and high. The circle is centred in the image (at x=25 and y=25) and has radius 24. (I know these things because I looked at the original SVG image in Inkscape.)
To start with, we need a HTML page that will contain our work:
<!DOCTYPE html> <html> <head> <meta charset="UTF-8" /> <title>Raphaël</title> <script src="https://code.jquery.com/jquery-3.0.0.min.js"></script> <script src="https://bit.ly/raphael-220_js"></script> <script src="raphael1.js"></script> </head> <body> <h1>Raphaël</h1> <div id="container"></div> </body> </html>
The page is similar to the others we have seen, but it include the Raphaël library. The <div id="container"> will hold the image we create.
setup = function() {
  paper = Raphael('container', 50, 50)
  circ = paper.circle(25, 25, 24)
  circ.attr({
    'fill': '#f00',
    'stroke': '#000',
    'stroke-width': '2'
  })
}
jQuery(document).ready(setup)
You can have a look at this page to see that the result is pretty close. Here's a screenshot of what it looks like in one browser:
Let's look more closely at the contents of the setup function that is doing the work:
paper = Raphael('container', 50, 50)- This creates a Raphaël SVG object inside the thing with
id="container"that is 50 pixels wide, and 50 pixels high. We store it in a variablepaperbecause Raphaël calls the thing you draw on a paper. circ = paper.circle(25, 25, 24)- A paper object contains a function
circlethat draws a circle on it. This line creates a circle with centre at point (25, 25) and radius 24. We'll put the circle object into the variablecircbecause we need to change some of its properties in the next line. circ.attr(…)- Every SVG shape object in Raphaël contains the
attrmethod that can be used to change various attributes of the shape. The argument that you give toattris an object with the properties you want to shape to have. In this case, we want to manipulate the circle to make it look more like our example. { 'fill': '#f00', … }- This JavaScript object describes the appearance of the shape, almost as if they were CSS rules for the shape. The first one (
'fill') sets the colour inside the shape to red. The others in this example set the outline colour and thickness.
There are many attributes that can be set on SVG elements to control the way they look. We will cover them as you need them: there are SVG reference materials out there, but you won't need them for this course.
Another Example
Let's have a look at a few more things Raphaël can do. Here we create a 200 × 100 pixel image (SVG measures in pixels by default even though it's vector-based: it's just a convenient unit of measure in this context) and add a few elements to it:
setup = function() {
  paper = Raphael('container', 200, 100)
  elli = paper.ellipse(50, 20, 40, 10)
  elli.attr({
    'fill': '#0f0',
    'stroke': '#999',
    'stroke-width': '4'
  })
  caption = paper.text(100, 50, 'I think this is going well.')
  caption.attr({
    'font-size': '14',
    'font-family': 'serif'
  })
  rect = paper.rect(150, 50, 40, 30)
  rect.attr({
    'transform': 'r30',
    'stroke': '#070'
  })
}
jQuery(document).ready(setup)
Here, we created an ellipse with a particular line and fill type; some text giving the font; and a rectangle that has been rotated 30 degrees (clockwise). The result looks like this:

As you can see, there are many functions in the paper object that are used to create shapes and other elements. The details can be found in the Raphaël reference, but we will introduce the ones you need here: no need to dive into that reference unless you really want to have a look around.
For example, the .ellipse() function needs four arguments: the x and y (horizontal and vertical) positions for the centre of the ellipse, and the horizontal and vertical radius. For .text(), you give the x and y position and the actual text to display. For .rect(), the arguments are x, y, width and height.
The .attr() function that every element in the image has is a little more complicated since it can be used to set many visual characteristics of the elements. The way it can be used varies by the type of element it's applied to.
Note the extra { … } in the arguments: the values we are giving are actually elements of a JavaScript object, which we will discuss in detail later. For now, just make sure to specify the values as in the examples.
We will also explore the different attributes you can specify here as we go on.