Bitmap Images
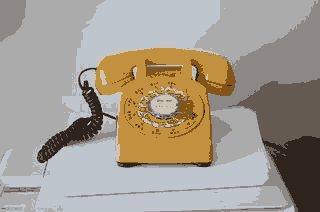
Let's return to the screenshot of the sample web page from Attributes and More:
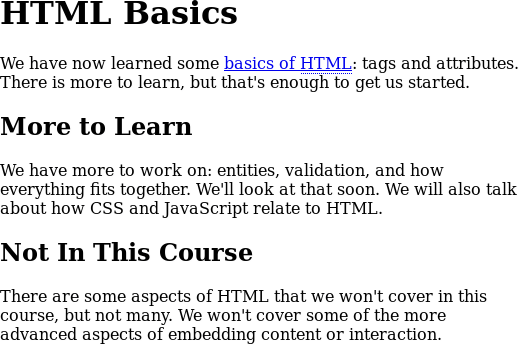
Since the image is a screenshot and computer displays inherently display bitmaps, this should be saved as a bitmap (not vector) image. Let's take a closer look at the first few characters in the first paragraph:

As we expect, the image is made up of a grid of pixels. We can add a grid to make the individual pixels more clear:
When the computer stores this bitmap data on disk (or transmits it over the Internet), is basically has to store the colour of each pixel. Essentially, that information is “Row 1: white pixel, white pixel, white pixel, … Row 2: dark grey pixel, black pixel, black pixel, dark grey pixel, …”. Of course, the way the computer represents that information isn't english descriptions like that, but the basic idea is the same.
The BMP (Windows Bitmap) format simply records the colour of each pixel with no compression (typically). If we save the original screenshot in that format the result is a 526 kilobyte file. That is a lot for a relatively small image. The BMP format isn't used on the web because it produces such large files.
We can instead save an image as a PNG (Portable Network Graphics) which is common on the web. PNG uses data compression to represent images in smaller files with no loss in quality. Saving the screenshot as a PNG, I got a 36 kilobyte file: much smaller than without any compression, but we can do better if we actually understand a little more about images.
Colour Depth
One factor that has a large impact on the size of a bitmap image file is the amount of information that much be stored for each pixel. This is determined by how many choices there are for the colour of each pixel.
In the figures above, we can see that there are relatively few colours actually used: white, black, and a few greys (and a few shades of blue for the link, which isn't in the enlargement).
The default for most image editing programs is images with a full range of colour for each pixel. This is called 24-bit colour or true colour. The reason for the name “24-bit colour” is that each pixel can be any of 224 possible colours. This is enough to represent images like photographs that have many shades of colours used in their pixels. The drawback is that there is a lot of information for each pixel and file sizes tend to be large.
Using 24-bit colour for an image like the screenshot above isn't necessary, since there are only a few colours there. However, the 36 kilobyte PNG file mentioned above was saved with 24-bit colour because it was the default.
It is also possible to choose fewer colours for an image file: the file contains a palette of colours that it will use, and then for each pixel, the image must indicate which of the palette colours is to be used.
The largest palette usually used in images contains 28 = 256 colours and is called 8-bit colour. In this case, each pixel takes about 1/3 of the storage space of a true colour image (8 bits instead of 24).
When the screenshot above was saved as a 24-bit PNG image, it was a 36 kilobyte file. When converted to 8-bit colour and saved, it was 19 kilobytes. That's more than a third of the original size (probably because of the overhead of storing the palette information and some other overhead), but a significant savings.
Palettes can other numbers of colours, usually powers of two so “n-bit colour” uses up to 2n colours. For example, reducing the screenshot to 23 = 8 colours, the file size decreased to 9 kilobytes with no noticable reduction in quality. (My image editor chose shades of grey and blue to represent the antializing in the image: if I look really closely maybe I can see tiny differences in the darkness around the edges of the characters, but nothing that I would ever care about.)
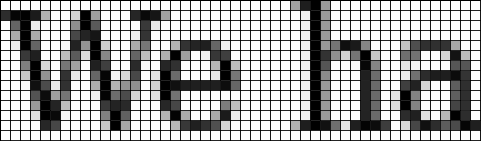
Here are some details of the screenshot after being saved with 256 and 8 colours:
Obviously the choice of colour depth has a lot to do with the content of the image: the screenshot has very few unique colours so choosing a small palette makes the file smaller without losing quality.
If the original had lots of colours, then selecting only a few for the whole image might decrease its quality significantly. For example, our photograph from above looks like this when saved with 256 and 8 colours:
Neither of these is particularly good: reducing colour depth is not a good option for this image. (The 256 colour version isn't too bad, but it is actually a larger file than the original for reasons we will see in the next section.)
Image Compression
The bitmap image formats used on the web all use some kind of compression (or data compression) to make the file smaller. As we noted above, and uncompressed BMP of the screenshot was about 15 times larger than even the largest PNG we created. Compressing image data is very effective, and necessary to make the images download quickly.
There are several ways to compress images (or other data). The details of the algorithms are complicated and not something we'll cover here.
Many image formats use lossless compression, which means that the data before compression is exactly the same as the result after compressing and uncompressing.
That seems like a good idea: we don't want our images to change just because we saved them in some format (and we certainly don't want a Word document to change if we put it in a ZIP file). PNG uses lossless compression: if you save a file as a PNG and re-open it, you will get exactly the same image back (unless you change the colour depth as part of saving the image, of course).
It is also possible to store images using lossy compression, where the image we get back might be slightly different than the original. This can get us a much smaller file, and as long as the differences are subtle, we probably won't mind.
The JPEG compression algorithm is lossy and designed specifically for photographs. JPEG files are excellent for storing photographs, but not good at other types of images.
The JPEG algorithm has a “quality” parameter (1–100) which can be used to trade off file size and image quality. In order to explore this, and the kind of lossiness JPEG has, let's look at an example photo:
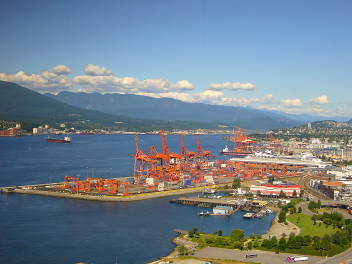
The examples below start with the original image scaled to 1408 × 1056 pixels: possibly too large to fit reasonably on a web page, but it's big enough we'll be able to see the quality differences well. Here is a small detail of the image (the foot of the leftmost crane), after being saved at various JPEG qualities:

As you can see, some details in the image are lost as the quality decreases. From quality 90 to 70 to 50, there is a little decrease in sharpness (the shipping containers on the right of the detail, edges of the vertical orange beams). In the images saved at 30 and 10 there is a very noticable decrease in quality.
But also have a look at the file size: it decreases from 510 kilobytes to only 37. There is an obvious tradeoff here that we can make. How to best make it will depend on the image and how it is being presented.
The best I could do with the image saving it as a (lossless) PNG file was 670 KB: choosing the right file format will definitely save us download time.
But a non-photo doesn't get the same results with JPEG. When I saved the screenshot as a JPEG image, the file size was 27 kilobytes, which is larger than the PNG image (which we got down to 19 and 9 kilobytes with various options). But worse, we can have a look at part of the result:

That doensn't look too bad, but let's take a closer look at the same part of the image as above:

Here we can see the real problem of JPEG compression when it's applied to non-photographs: since it's not designed for that type of image, the details it changes to save file size are noticable and make the image look worse.
Summary
After all of that, there are still only really three image format that make sense for web pages (because they are supported by browsers):
- SVG
- The vector graphics format that can be used on the web. If you have an image that can be represented as a vector image, this is probably the best choice.
- JPEG
- A bitmap image format with lossy compression designed for photographs. Does a great job with photos and a bad job with everything else. Choose a “quality” that balances loss of detail with file size.
- PNG
- A bitmap format with lossless compression. Probably the best choice for everything except photographs. Choose a good colour depth for the smallest possible file.
You will also see GIF images on the web, but the compression in PNG images is better so you probably wouldn't choose GIF. The GIF format does support simple animations (which the other formats don't) but there are also many video formats: those are a better choice for this usage.
It would be nice to re-frame this section to be more explicitly goal-oriented, with the "goal" being to keep quality high, while minimizing file size. Lecture notes may have taken a better path.
Possibly do a video playing with some images and comparing file sizes?