In this section, we will pause to work on a web page and stylesheet, so we can see how some of these ideas fit together.
We will produce a web page with a recipe: that will give us some real content where we can make realistic decisions about the markup we use.
HTML for Content
We can start with the provided HTML page skeleton in the Code Snippets appendix: it contains the basic parts we now know we need in every page.
There are two basic parts to a recipe: a list of ingredients and a list of steps to follow to complete the dish. These are both lists, but semeantically quite different. The list of ingredients has no particular order, but the order of the steps is very important. So, we will use <ul> for the list of ingredients and <ol> for the list of steps to follow.
We will also include <section> elements that we haven't used before: they can be used to enclose a section of the page (or nested to indicate subsections).
<!DOCTYPE html> <html lang="en"> <head> <meta charset="UTF-8" /> <link rel="stylesheet" href="recipestyle.css" /> <title>Guacamole Recipe</title> </head> <body> <h1>Guacamole Recipe</h1> <p id="servings">Makes enough for a small party.</p> <section id="ingred"> <h2>Ingredients</h2> <ul> <li>4 ripe avocados</li> <li>5 cloves garlic, minced</li> <li>125 mL can jalapeño peppers, minced</li> <li>1 tbsp lime juice</li> <li>1 tsp salt</li> <li>1/2 tsp pepper</li> </ul> </section> <section id="steps"> <h2>Instructions</h2> <p>This recipe is actually very easy…</p> <ol> <li>Scoop out the flesh of the avocados into a bowl.</li> <li>Combine all of the other ingredients in the bowl.</li> <li>Mash with a potato masher until the desired consistency is reached.</li> </ol> </section> </body> </html>
The id values can also be used as a fragment in a link. If we put #steps at the end of a link to this page, the browser will scroll to the element with id="steps".
Also notice that we used the ñ to produce the “ñ” character in “jalapeño”.
This is good markup for this content. We may want to refine it later, but you should start with markup that makes semantic sense for the content.
CSS for Appearance
We will also start with the example CSS from the Code Snippets appendix. That may not be what you want for every page, but it's at least a start for us.
The isn't much method to the other CSS changes made here: they are the result of experimenting and finding things that didn't look too bad. You may want to review some of these properties in the CSS Reference.
body {
  font-family: "Helvetica", sans-serif;
  color: #222;
  line-height: 1.4;
  padding: 0 1em;
}
h1 {
  background-color: #5b5;
  color: white;
  text-align: center;
}
h2 {
  border: thin solid #5b5;
  border-top: thick solid #5b5;
  padding-left: 0.25em;
}
ul, ol {
  padding-left: 1.5em;
}
ul {
  list-style-type: circle;
}
p#servings {
  font-style: italic;
}
This is what the above HTML looks like with this CSS applied, or see the the actual page.
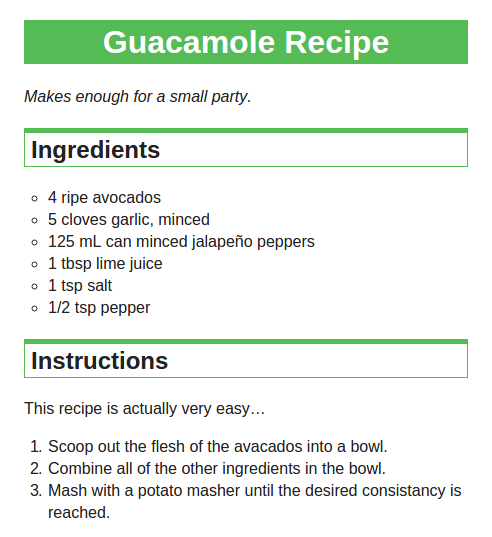
At this point, the page looks much better than the default, but a few more details would be nice…
More Enhancements
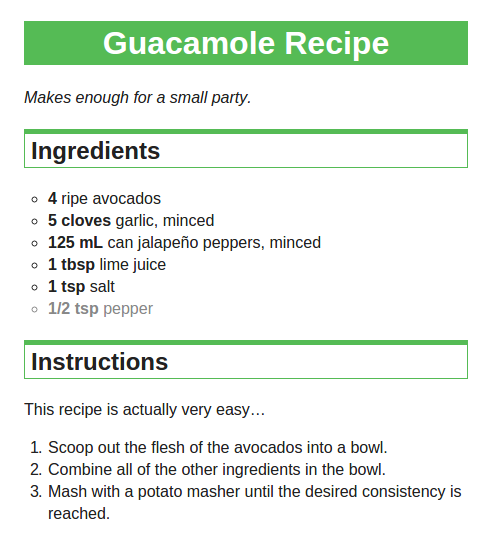
On the above page, I would like to highlight the quantities of the ingredients (e.g. in “1 tbsp lime juice”, the quantity is “1 tbsp”) so they can be visually distinguished. I also know that the last ingredient is option and would like to present it with grey text.
With the HTML as it is, this won't be possible. We can go back to our HTML and insert markup to distinguish these pieces of content. For the optional ingredient, we can simply apply class="optional" to the list item.
For the quantities of ingredients, we would like to find a meaningful HTML tag for that kind of content, but don't really find anything in the reference. In that case, we use one of the generic tags with a meaningful class or id attribute: we will use <span> in this case since it is inline content. Now our list of ingredients will become:
<ul> <li><span class="quantity">4</span> ripe avocados</li> <li><span class="quantity">5 cloves</span> garlic, minced</li> <li><span class="quantity">125 mL</span> can jalapeño peppers, minced</li> <li><span class="quantity">1 tbsp</span> lime juice</li> <li><span class="quantity">1 tsp</span> salt</li> <li class="optional"><span class="quantity">1/2 tsp</span> pepper</li> </ul>
Then we can add CSS to select these elements and style them appropriately:
span.quantity {
  font-weight: bold;
}
.optional {
  color: #888;
}
Now our page looks like this, or see the the actual page.
This is by no means intended to be a definitive look at things that can be done with HTML and CSS, but should give you a decent example of what you can do with the tools you have now.